

Octave Script Workspace: from the Analysis page to the registered script
The GX-TXT Analysis page gives access to saved scientific scripts through the optional Scripts (CORE) panel. In this guide we prepare a GNU Octave script, bind a canonical Dataset to it through a semantic alias and verify the actual execution without using Script Library.
The screenshots refer to GX-TXT DEV112 with Octave Script Workspace 1.8.3. The case uses only five synthetic values, a dedicated Session and the public APIs available in GX-TXT. It is important to distinguish the CORE panel for registered scripts from the old configuration path of the Analysis module.
1. Showing Scripts (CORE) on the Analysis Page
Open the scientific Session in which you want to work. In the Modules tab, look for Optional CORE workspace surfaces and enable the Show Script Workspace checkbox. The same preference is called Show Script Workspace in Analysis in Configuration → Scripts.

This preference concerns the presentation of the interface; it is not a Run command and does not automatically change the selection of computation modules. After enabling it, the Analysis page hosts a panel for selecting and reviewing registered scripts.
2. Preparing and Saving the Script in the Source
Open Octave Script Workspace, create a new .m file and save it as a Session script. In the example case, the source declares a gain parameter, requires the canonical Dataset API and checks that the execution context contains the measured alias.
% Registered Octave Source, with synthetic input data.
gxtxt_parameter_declare('gain', 'double', 'default', 1.5, ...
                        'min', 0.1, 'max', 3.0, ...
                        'description', 'Synthetic input scale');

ctx = gxtxt_context();
gxtxt_api_require('CANONICAL_DATASET_API_v2');

if (!isfield(ctx.inputs, 'measured'))
  error('Expected reviewed semantic input alias measured is missing');
endif

bound_id = ctx.inputs.measured.dataset_id;
if (!strcmp(bound_id, 'o19_input_signal'))
  error('Unexpected canonical Dataset ID selected');
endif

fprintf('MEASURED_INPUT_DATASET=%s\n', bound_id);
fprintf('SOURCE_GAIN=%.2f\n', ctx.parameters.gain);
fprintf('WORKING_DIRECTORY=%s\n', pwd());
disp('Registered source integration completed');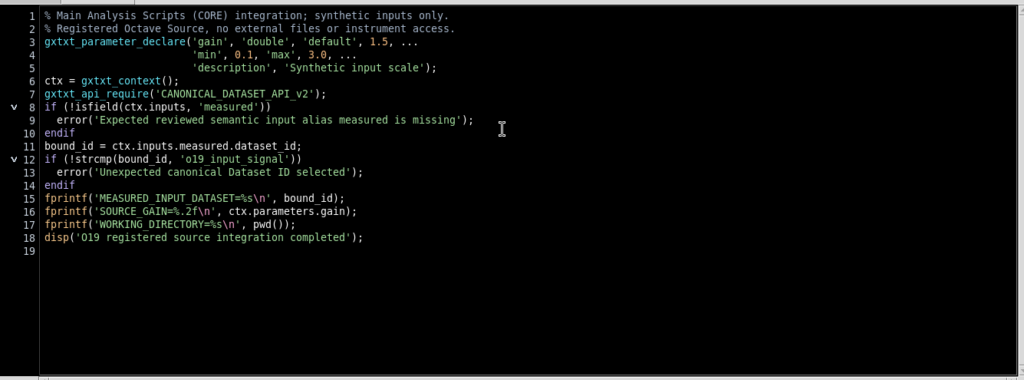
The ID o19_input_signal is a demonstration name: in a real Session it must be replaced with that of your own Dataset. In the Script properties, set Additional required APIs to CANONICAL_DATASET_API_v2 and save with File → Save. The registry keeps version, revision, SHA-256 and API requirement together with the code. Saving does not run Octave.
3. Selecting the Script on the Analysis Page
Switch to Analysis and go to Scripts (CORE). The Registered script field lists the available scripts, including those saved in the Session. Select the desired script and check that the reference starts with session:.

The operating path is Analysis → Scripts (CORE) → Run registered script…. There is no need to open Script Library. A User script must be available to the intended execution context; the case shown uses a script registered directly in the Session.
4. Opening Script Runner and Checking the Revision
Press Run registered script…. The normal Script Runner appears, with name, language, registered reference, version, revision and SHA-256 of the saved source. The Invocation parameters section contains gain with default 1.5.
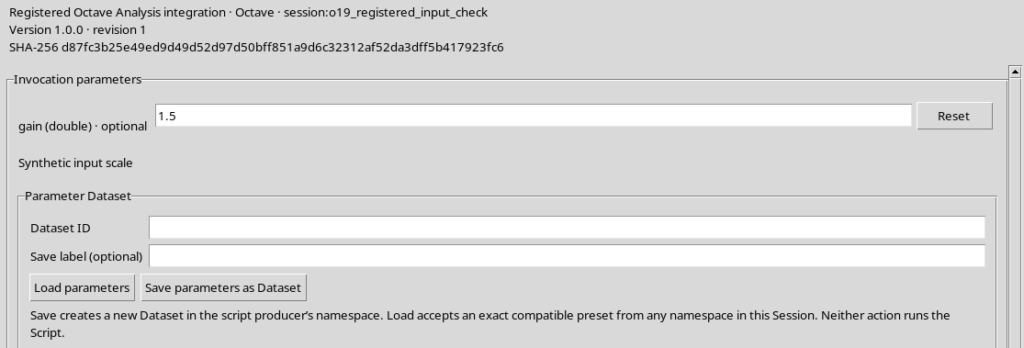
Opening the Runner does not submit a Job. The revision and the SHA-256 indicate which source will be reviewed. If you change the code in the editor, you must save or explicitly choose which revision to use before proceeding.
5. Binding the Dataset with Namespace and Alias
Before the test, a synthetic canonical table.generic Dataset is available in the Session, with five samples and the variables time_s and response_V. The Dataset is located in the bench/measurements namespace.
In Runner open Inputs and output, press Add input Dataset, then choose:
| Field | Example value |
|---|---|
| Semantic alias | measured |
| Namespace | bench/measurements |
| Dataset ID | o19_input_signal |
| Display label (optional) | Synthetic measured voltage |
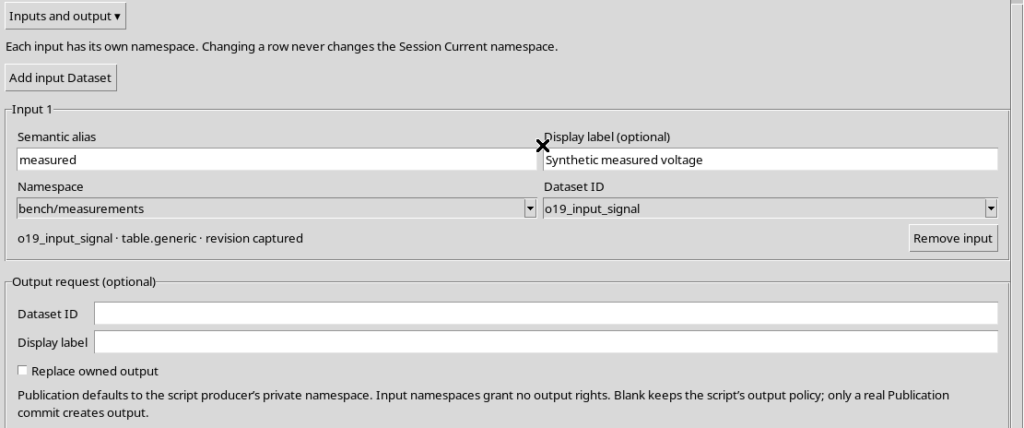
The selection produces the revision captured indication. The name measured identifies the binding in the script context, while the Dataset ID remains the canonical identity of the data. The Dataset is not moved when you choose a namespace in the Runner row, and the current namespace of the Session is not changed.
6. Understanding How the Script Receives Data and Parameters
During the Job, gxtxt_context() returns the context of the specific invocation. The script can therefore read ctx.inputs.measured.dataset_id and ctx.parameters.gain: these values come from the controlled preparation in the Runner, not from a path written in the .m file.
The CANONICAL_DATASET_API_v2 requirement is checked before execution. You can also call gxtxt_api_require in the source, as in the example. The default working directory of the registered Job corresponds to the scientific Session, while the path of the registered source is not automatically added to the Octave path.
The APIs and their operations must be checked in the installed GX-TXT public documentation: a required API name is not the same as the availability of any operation one might imagine.
7. Running Validate Review Before the Job
With gain = 1.5 and the measured input selected, press Validate review. The Runner checks source identity, parameter types, alias, namespace, Dataset ID and input revision.
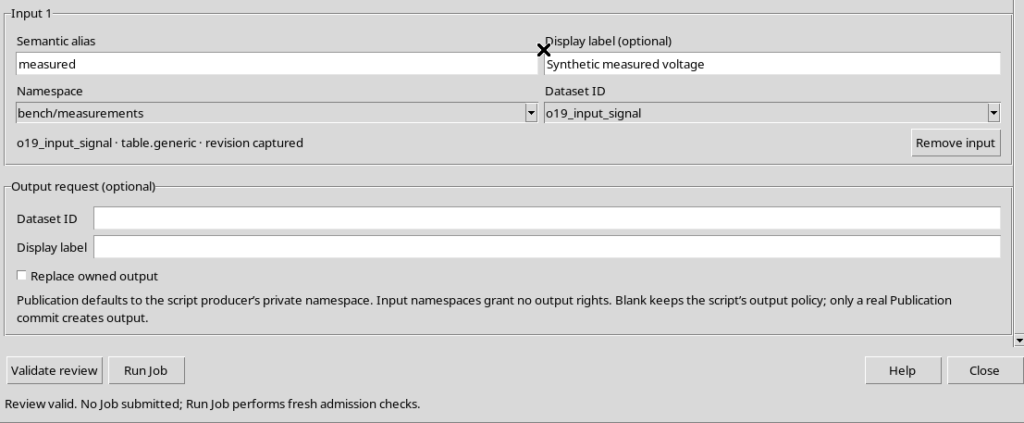
The message Review valid. No Job submitted does not mean that the script has already worked on the data. It is the necessary preparation before requesting execution.
8. Starting the Octave Job Only Once
Press Run Job. During admission the GUI shows Submitting immutable Script and input snapshots… and temporarily disables the relevant controls.
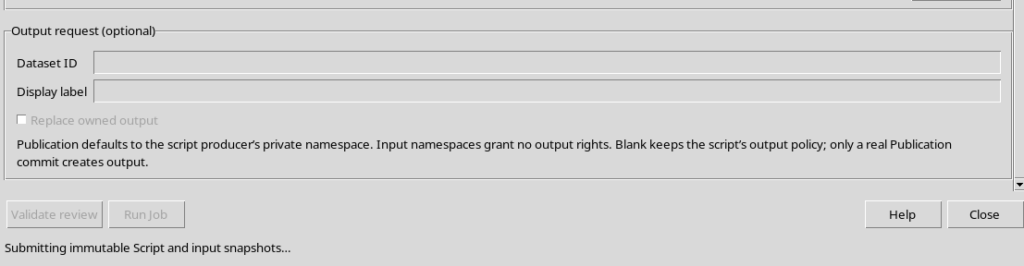
The request records the SHA-256 of the source, the revision, the value of gain and the identity/revision of the Dataset bound to measured. This phase is not yet a confirmation of completion; the outcome must be read in the Job supervisor.
9. Checking Script Jobs and the Execution Report
From the Analysis → Scripts (CORE) page use Script Jobs…, or open the same window after submission. The table shows the Job with script name, language, version, revision and terminal state.
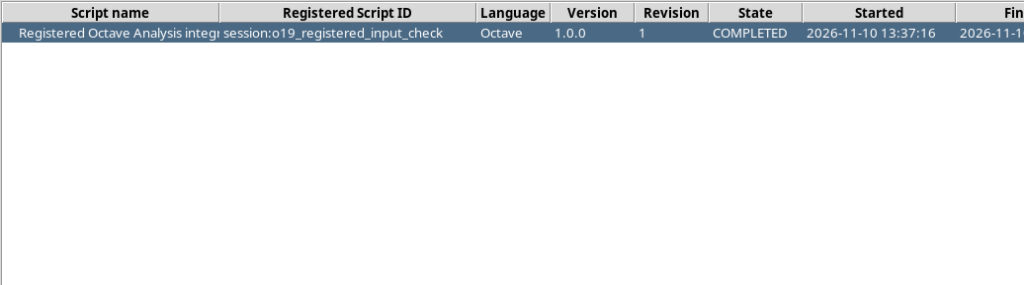
Opening the Job details, Program output confirms, for example, MEASURED_INPUT_DATASET=o19_input_signal and SOURCE_GAIN=1.50. The executed_script.m file, kept by the Job, contains exactly the source admitted for execution; the octave_script_run_report.txt report records Status: PASS, GNU Octave 9.4.0, the required API, Source mode: registered_script and the actual working directory.
The supervisor distinguishes the user’s Script Jobs from automatic CORE Jobs, for example those needed to prepare a Dataset Preview. In the test, the Octave Job is COMPLETED and the input Dataset remains unchanged. This script does not create any new output Dataset: it prints and checks the input information. Publishing scientific results through APIs belongs to a different step.
10. Distinguishing the Registered Path from the external_file Mode
The installed analysis.octave_script module also defines two source origin modes, but not both can be selected in the Scripts (CORE) panel shown here.
| Aspect | Behavior |
|---|---|
Registered script (registered_script) | This is the path available in Scripts (CORE), with registry revision and SHA and a supervised Job |
External file (external_file) | It is provided for by the module contract and by the runtime, but it does not appear as a file selector in the Scripts (CORE) panel shown |
| Working directory | For the registered script the Session is used as default; configuring a custom directory belongs to the module contract, not to the fields of this panel |
| Include script directory | The option concerns the external mode; in the registered script test the code directory is not added to the Octave path |
The Analysis Octave module may appear as CORE / OFF as a traditional module and not show its own configurable tab: this does not prevent the Analysis → Scripts (CORE) path when the optional interface is enabled. It is not advisable to invent a GUI procedure for external_file if no visible selector exists in your installation.
Path to remember: save the code in the Source, enable Show Script Workspace, select the script in Analysis → Scripts (CORE), open Run registered script…, bind the inputs, perform Validate review, submit Run Job and check the outcome in Script Jobs and in the scientific report.